Thursday, 29 December 2016
Tuesday, 22 November 2016
SFML Starter Project Visual Studio 2015
Since migrating to Visual Studio 2015, projects that previously worked in Visual Studio 2013 may not work out of the box. To aid easier migration some projects have be ported to Visual Studio 2015.
Projects have the following prerequisites:
Step 1 Open GitBash Client and Clone Repository
 Clone repository by entering the following command in GitBash
Step 2 Start Visual Studio 2015, Open and Build Project and launch Local Window Debugger

Examine the following within Solution | Properties | Build Events | Post-build Events

This will display a Build event which copies SFML application required DLL's. More information on Visual Studio 2015 Pre-Build events are located at https://msdn.microsoft.com/en-us/library/42x5kfw4.aspx
On successfully executing the project edit files as required.
Projects have the following prerequisites:
- GitBash (required)
- Visual Studio Studio 2015 Community Edition (required - minimum)
- Cloned Project (via GitBash or other Git Client)
https://bitbucket.org/MuddyGames/lab04-gameplay-programming-i - SFML must be installed for project
- Version SFML 2.3.2
Visual C++ 14 (2015) - 32-bit
http://www.sfml-dev.org/files/SFML-2.3.2-windows-vc14-32-bit.zip
Step 1 Open GitBash Client and Clone Repository
- Open GitBash and check present working directory by entering pwd command in GitBash.
- Make a new sub-directory projects. This directory can be created by entering mkdir projects command in GitBash
- Change to that directory by entering cd projects command in GitBash.

git clone https://MuddyGames@bitbucket.org/MuddyGames/lab04-gameplay-programming-i.git
Step 2 Start Visual Studio 2015, Open and Build Project and launch Local Window Debugger
- Open project using Visual Studio 2015 and navigate to the cloned repository.
- Enter ls command in GitBash to verify location of cloned project directory.

Examine the following within Solution | Properties | Build Events | Post-build Events

This will display a Build event which copies SFML application required DLL's. More information on Visual Studio 2015 Pre-Build events are located at https://msdn.microsoft.com/en-us/library/42x5kfw4.aspx
xcopy $(SFML_SDK)\bin $(TargetDir) /C /Y
On successfully executing the project edit files as required.
Wednesday, 16 November 2016
Installing PIP and Pillow within GIMP python
The following installation and setup tests were performed on a Windows 7 and Windows 10 machine using Powershell (Running as administrator). This setup utilises GIMP and Pillow in concert to produce a scripted poster (plugin produced poster) .
Step 1
Install GIMP 2.8.18 in the folder below by selecting custom install. For this tutorial GIMP was installed within;
Step 2
Launch PowerShell (run as an administrator) and navigate to the Python folder within GIMP installation

Step 3
Set the script execution policy to unrestricted, so that all download scripts can be run (Caution: any scripts you execute from this point onward are ran in unrestricted mode, only run trusted scripts)
Type Set-ExecutionPolicy Unrestricted in Powershell
Step 4
Make a directory for install scripts; for this tutorial we will include install scripts for pip and pillow.
Type mkdir install_scripts into Powershell
Step 5
Download install scripts. In PowerShell issue the following commands to download get-pip.py
(NOTE: make sure file destination folder already exists prior to running PowerShell command)

After running this command get-pip.py file should be created as shown below.

Step 6 (Very Important Step!)
Verify that the correct version on Python is in use within GIMP by specifying path. Set path to the location of GIMP's Python installation by setting env:Path as show below.
Check modules already installed and then install pip. Launch python and note that version should be 2.7.10 (The error show below in the pygtk.pth will be addressed later)
Next check if the pygtk module is installed by typing help("modules") or to just list pygtk type the following;
This will result in the following screen if successful. If its not listed check the GIMP 2.8.18 installing again.

Step 7
Install pip by issuing the following command in PowerShell (check location of get-pip.py file)
Install pillow by issuing the following command in PowerShell
Start python shell and issue the following command in python shell to list installed PIL modules
PIL installed modules will be listed

Step 8
To check that pillow is installed correctly launch python shell (GIMP's installed version). Place an image within the temp directory and make a copy using the following python code.
This should make a copy of the source image ProfilePicture.png and place within the same directory.

Next add hello_world.py plugin to GIMP plugins directory (see creating plugins post) , launch GIMP to verify setup.
If the plugin produced a file (copy_script.png) your environment is working correctly. If the script runs correctly you should see the following after File | New and Filter | Render | Hello World

Final Notes
PowerShell
To make it easier to install and check that plugins are running a Powershell Script (Source) be used. This script was tested on Windows 10 machine with PowerShell running as Administrator. On successful execution of the Powershell Script (Source) you should be able to use the 'Hello World' script via Filter | Render | Hello World as shown below;

Execute the script using the following command if script execution has been disabled;
Custom Script Locations
The file gimprc enables GIMP preferences. This file can be very useful for adding new locations for script plug-ins. The file can be edited with a text editor or via Edit | Preferences.
There are two locations for the file, the global file is located with GIMP # folder and the user specific file is located in users directory as shown below.

Add the following line to gimprc to make it a default location for your custom plugins
Save the file and restart GIMP any custom plug-ins within the plug-in-path specified above should now be listed with GIMP.
Step 1
Install GIMP 2.8.18 in the folder below by selecting custom install. For this tutorial GIMP was installed within;
C:\devtools\GIMP 2
Step 2
Launch PowerShell (run as an administrator) and navigate to the Python folder within GIMP installation

PS C:\Windows\system32> cd..
PS C:\Windows> cd..
PS C:\> cd .\devtools
PS C:\devtools> cd '.\GIMP 2'
PS C:\devtools\GIMP 2> cd .\Python
PS C:\devtools\GIMP 2\Python> ls


    Directory: C:\devtools\GIMP 2\Python


Mode                LastWriteTime     Length Name
----                -------------     ------ ----
d----        16/11/2016     09:26            DLLs
d----        16/11/2016     09:27            Lib
-a---        23/05/2015     11:40      26624 python.exe
-a---        23/05/2015     11:40    2459648 python27.dll
-a---        23/05/2015     11:40      27136 pythonw.exe
Step 3
Set the script execution policy to unrestricted, so that all download scripts can be run (Caution: any scripts you execute from this point onward are ran in unrestricted mode, only run trusted scripts)
Type Set-ExecutionPolicy Unrestricted in Powershell
PS C:\devtools\GIMP 2\Python> Set-ExecutionPolicy Unrestricted
Step 4
Make a directory for install scripts; for this tutorial we will include install scripts for pip and pillow.
Type mkdir install_scripts into Powershell
PS C:\devtools\GIMP 2\Python> mkdir install_scripts


    Directory: C:\devtools\GIMP 2\Python


Mode                LastWriteTime     Length Name
----                -------------     ------ ----
d----        16/11/2016     09:45            install_scripts
Step 5
Download install scripts. In PowerShell issue the following commands to download get-pip.py
(NOTE: make sure file destination folder already exists prior to running PowerShell command)

PS C:\devtools\GIMP 2\Python> (new-object System.Net.WebClient).DownloadFile('https://bootstrap.pypa.io/get-pip.py', 'C:\devtools\GIMP 2\Python\install_scripts\get-pip.py')
After running this command get-pip.py file should be created as shown below.

Step 6 (Very Important Step!)
Verify that the correct version on Python is in use within GIMP by specifying path. Set path to the location of GIMP's Python installation by setting env:Path as show below.
PS C:\devtools\GIMP 2\Python> $env:Path = ".";;
Check modules already installed and then install pip. Launch python and note that version should be 2.7.10 (The error show below in the pygtk.pth will be addressed later)
PS C:\devtools\GIMP 2\Python> python
Error processing line 3 of C:\devtools\GIMP 2\Python\lib\site-packages\pygtk.pth:

  Traceback (most recent call last):
    File "C:\devtools\GIMP 2\Python\lib\site.py", line 152, in addpackage
      exec line
    File "<string>", line 1, in <module>
  ImportError: No module named runtime

Remainder of file ignored
Python 2.7.10 (default, May 23 2015, 09:40:32) [MSC v.1500 32 bit (Intel)] on win32
Type "help", "copyright", "credits" or "license" for more information.
>>>
Next check if the pygtk module is installed by typing help("modules") or to just list pygtk type the following;
>>> help("modules pygtk")
This will result in the following screen if successful. If its not listed check the GIMP 2.8.18 installing again.

Step 7
Install pip by issuing the following command in PowerShell (check location of get-pip.py file)
PS C:\devtools\GIMP 2\Python> .\python.exe 'C:\devtools\GIMP 2\Python\install_scripts\get-pip.py'
Install pillow by issuing the following command in PowerShell
PS C:\devtools\GIMP 2\Python> python -m pip install pillow
Start python shell and issue the following command in python shell to list installed PIL modules
>>> help("modules pil")
PIL installed modules will be listed

Step 8
To check that pillow is installed correctly launch python shell (GIMP's installed version). Place an image within the temp directory and make a copy using the following python code.
>>> from PIL import Image
>>> im = Image.open("C:\\temp\\ProfilePicture.png")
>>> im.save("C:\\temp\\copy.png")
>>>
This should make a copy of the source image ProfilePicture.png and place within the same directory.

Next add hello_world.py plugin to GIMP plugins directory (see creating plugins post) , launch GIMP to verify setup.
1 2 3 4 5 6 7 8 9 10 11 12 13 14 15 16 17 18 19 20 21 22 23 24 25 26 27 28 29 30 31 | from gimpfu import * from PIL import Image import datetime import sys def hello_world(): sys.stdout = open( 'c:\\temp\\out.txt', 'a') print(datetime.datetime.now()) print('Hello_World') pdb.gimp_message('Hello World !....') pdb.gimp_message('Producing Image!....') im = Image.open("C:\\temp\\ProfilePicture.png") # Place an image in an accessible folder im.save("C:\\temp\\copy_script.png") # Copy of image saved pdb.gimp_message('Image Produced.....') print('Finished processing') register( 'python-fu-hello-world', # Plugin unique name 'Hello World', # Tooltip short name 'This is a Hello World Plugin', # Tooltip long description 'Muddy Games', 'Muddy Games', '2016', # Creator, Copyright owner, released 'Hello World', # Menu name '*', # Supported image color * <all> [], # Input Parameters [], # Return Parameters hello_world, # Method to call menu='<Image>/Filters/Render') # Menu entry location main() |
If the plugin produced a file (copy_script.png) your environment is working correctly. If the script runs correctly you should see the following after File | New and Filter | Render | Hello World

Final Notes
PowerShell
To make it easier to install and check that plugins are running a Powershell Script (Source) be used. This script was tested on Windows 10 machine with PowerShell running as Administrator. On successful execution of the Powershell Script (Source) you should be able to use the 'Hello World' script via Filter | Render | Hello World as shown below;

Execute the script using the following command if script execution has been disabled;
powershell -ExecutionPolicy ByPass -File .\GIMP_Pillow_Scripting.ps1
Custom Script Locations
The file gimprc enables GIMP preferences. This file can be very useful for adding new locations for script plug-ins. The file can be edited with a text editor or via Edit | Preferences.
There are two locations for the file, the global file is located with GIMP # folder and the user specific file is located in users directory as shown below.
C:\Users\[Username]\.gimp-2.8

Add the following line to gimprc to make it a default location for your custom plugins
(plug-in-path "C:\\projects\\plug-ins")
Save the file and restart GIMP any custom plug-ins within the plug-in-path specified above should now be listed with GIMP.
Tuesday, 15 November 2016
Conceptual Introduction to Digital Arts and Humanities
As part of the Conceptual Introduction to Digital Arts and Humanities module and using a Pecha-kucha.org presentation style I've begun to ask the following question;
- Research Focus
- Research question
- Why this Research is important
- Why should the community be interested in this Research?
- What tools, processes, techniques and methods envisioned?
- What will the digital artifact look like and what will be produced
Saturday, 12 November 2016
GIMP python Plugin development on Windows 10 using Sublime Text 3
GIMP is a fantastic photo editor and ideal for graphic artists who want to create 2D characters and environmental art. One of its most interesting features is the ability to create custom plug-ins for automating editing and workflow processes. Potentially it could be used to create animated sprite sheets where character components could be programatically posed from frame to frame. This maybe very useful for current work on an game targeted at a Atmega644 8 bit games console.
The steps to creating a Hello World plugin on Windows 10 are as follows;
Step 1
Using File Explorer navigate to GIMP 2 installation plug-ins directory. This custom plug-in was tested with GIMP 2.8.18 available at https://www.gimp.org/downloads/
Step 2
Run Command Prompt (as administrator). The command prompt must be run as an administrator to enable creation and update of python files within the plug-ins directory.
Step 3
In the command prompt open Sublime Text 3 and hello_world.py file (new file) by typing the following into command prompt;
Step 4
Type the following code into Sublime Text 3 (Notepad / Idle / or your editor of choice can be used just by changing the editor executable in step 3)
Step 5
Launch GIMP and examine the Filters | Render menu and you should now see the Hello World plugin registered within GIMP.

Step 6
Create and new image and the plug-in should be enabled and useable. The Hello World message should appear within the error console [ Windows | Dockable Dialogs | Error Console ]


Would suggest reading http://stackoverflow.com/questions/14592607/installing-pygimp-on-windows
Enjoy writing plugins, the GIMP Plug-ins documentation is located at https://www.gimp.org/docs/python/index.html
As GIMP scripts are run and debugged within the GIMP application the following modified code maybe useful for debugging scripts. It uses system (sys) (to print to file) and datetime (timestamps) modules. It will create a log file within c:\temp. You could add a DEBUG macro / method and only log execution during script development and turn DEBUG off during production.
The steps to creating a Hello World plugin on Windows 10 are as follows;
Step 1
Using File Explorer navigate to GIMP 2 installation plug-ins directory. This custom plug-in was tested with GIMP 2.8.18 available at https://www.gimp.org/downloads/
C:\Program Files\GIMP 2\lib\gimp\2.0\plug-ins |
Step 2
Run Command Prompt (as administrator). The command prompt must be run as an administrator to enable creation and update of python files within the plug-ins directory.

Step 3
In the command prompt open Sublime Text 3 and hello_world.py file (new file) by typing the following into command prompt;
C:\Program Files\GIMP 2\lib\gimp\2.0\plug-ins>"C:\devtools\Sublime Text 3\subl" hello_world.py
|
Step 4
Type the following code into Sublime Text 3 (Notepad / Idle / or your editor of choice can be used just by changing the editor executable in step 3)
1 2 3 4 5 6 7 8 9 10 11 12 13 14 15 16 17 18 19 | from gimpfu import *
def hello_world():
pdb.gimp_message('Hello World !....')
register(
'python-fu-hello-world', # Plugin unique name
'Hello World', # Tooltip short name
'This is a Hello World Plugin', # Tooltip long description
'MuddyGames', 'MuddyGames', '2016', # Creator, Copyright owner, released
'HelloWorld', # Menu name
'*', # Supported image color * <all>
[], # Input Parameters
[], # Return Parameters
hello_world, # Method to call
menu='<Image>/Filters/Render') # Menu entry location
main()
|
Step 5
Launch GIMP and examine the Filters | Render menu and you should now see the Hello World plugin registered within GIMP.

Step 6
Create and new image and the plug-in should be enabled and useable. The Hello World message should appear within the error console [ Windows | Dockable Dialogs | Error Console ]


Would suggest reading http://stackoverflow.com/questions/14592607/installing-pygimp-on-windows
Enjoy writing plugins, the GIMP Plug-ins documentation is located at https://www.gimp.org/docs/python/index.html
As GIMP scripts are run and debugged within the GIMP application the following modified code maybe useful for debugging scripts. It uses system (sys) (to print to file) and datetime (timestamps) modules. It will create a log file within c:\temp. You could add a DEBUG macro / method and only log execution during script development and turn DEBUG off during production.
1 2 3 4 5 6 7 8 9 10 11 12 13 14 15 16 17 18 19 20 21 22 23 | from gimpfu import * import datetime import sys def hello_world(): sys.stdout = open( 'c:\\temp\\out.txt', 'a') print(datetime.datetime.now()) print('Hello_World') pdb.gimp_message('Hello World !....') register( 'python-fu-hello-world', # Plugin unique name 'Hello World', # Tooltip short name 'This is a Hello World Plugin', # Tooltip long description 'Muddy Games', 'Muddy Games', '2016', # Creator, Copyright owner, released 'Hello World', # Menu name '*', # Supported image color * <all> [], # Input Parameters [], # Return Parameters hello_world, # Method to call menu='<Image>/Filters/Render') # Menu entry location main() |
Thursday, 10 November 2016
Overloaded with overloading
In creating a custom Vector3 class and the necessary overloaded methods I assumed it would be relatively easy task. Its only as you begin to look at some of the overloading possibilities that one begins to realise that programmers can easily get bogged down and overloaded pretty quickly ;-). Its with this in mind that the following suggested code snippets were put together
The Vector3 header contains a friend operator+ overload (Line 5) and a class operator- overload (Line 14)
The Vector3.cpp file below contains the definitions for the two overloads
Note the use of custom namespace which avoids any clashes with other Vector3 classes already defined.
Next a SFML an project was created and a draw() method defined which was added to the GameLoop
To preserve memory (this memory now needs to be managed) a static variable v was initialized and updated in line 5. The + and - operations and now interchangeable. This lead me to read these CppReference articles on operator overloading and use of friend functions.
The Vector3 header contains a friend operator+ overload (Line 5) and a class operator- overload (Line 14)
1 2 3 4 5 6 7 8 9 10 11 12 13 14 15 16 17 18 | namespace custom { class Vector3 { friend Vector3 operator+(Vector3, const Vector3&); public: Vector3(); Vector3(double, double, double); Vector3(const Vector3&); ~Vector3(); const double getX(); const double getY(); const double getZ(); const Vector3 operator-(const Vector3&) const; private: double m_x, m_y, m_z; }; } |
The Vector3.cpp file below contains the definitions for the two overloads
1 2 3 4 5 6 7 8 9 10 11 12 13 14 15 16 17 18 19 20 21 22 23 24 25 26 27 | #include <Vector3.h> using namespace custom; Vector3::Vector3() : m_x(0.0f), m_y(0.0f), m_z(0.0f){ } Vector3::Vector3(double x, double y, double z) : m_x(x), m_y(y), m_z(z) { } Vector3::Vector3(const Vector3& o) : m_x(o.m_x), m_y(o.m_y), m_z(o.m_z) { } Vector3::~Vector3() { } const double Vector3::getX() { return m_x; } const double Vector3::getY() { return m_y; } const double Vector3::getZ() { return m_z; } const Vector3 Vector3::operator-(const Vector3& v) const { return Vector3(m_x - v.m_x, m_y - v.m_y, m_z - v.m_z); } custom::Vector3 custom::operator+(custom::Vector3 v1, const custom::Vector3& v2) { return Vector3(v1.m_x + v2.m_x, v1.m_y + v2.m_y, v1.m_z + v2.m_z); } |
Note the use of custom namespace which avoids any clashes with other Vector3 classes already defined.
Next a SFML an project was created and a draw() method defined which was added to the GameLoop
To preserve memory (this memory now needs to be managed) a static variable v was initialized and updated in line 5. The + and - operations and now interchangeable. This lead me to read these CppReference articles on operator overloading and use of friend functions.
1 2 3 4 5 6 7 8 9 10 11 12 13 14 15 16 17 | static custom::Vector3 v(0.0, 2.0, -5.0); void Game::draw() { v = v - custom::Vector3(0.0f, 0.0001f, 0.0f); cout << "Draw up" << endl; cout << "[x]" << v.getX() << " [y]" << v.getY() << " [z]" << v.getZ() << endl; glClear(GL_COLOR_BUFFER_BIT | GL_DEPTH_BUFFER_BIT); glBegin(GL_TRIANGLES);{ glVertex3f(GLfloat(v.getX()), GLfloat(v.getY()), GLfloat(v.getZ())); glVertex3f(-2.0, -2.0, -5.0); glVertex3f(2.0, -2.0, -5.0); } glEnd(); window.display(); } |
Wednesday, 9 November 2016
Tkintering with the Turtle
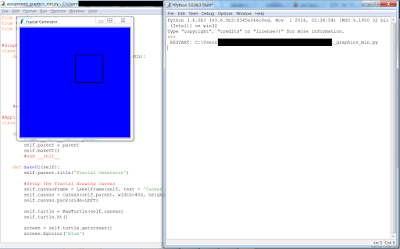
One of the DAH semester modules is CS6102. We here given a very interesting Python starter project assignment as part of CS6102. The brief was to make a fractal generator (using recursion). One of the most time consuming tasks was getting turtle graphics to work with tkinter and draw to a canvas.
Lines 7 to 17 below are a Graphics Pen class, note this uses Rawturtle
Line 33 is where the canvas is created note its reference to parent
Line 47 initializes the RawTurtle with a target of the canvas:
Running the code above produces the following output
Lines 7 to 17 below are a Graphics Pen class, note this uses Rawturtle
Line 33 is where the canvas is created note its reference to parent
self.canvas = Canvas(self.parent, width=400, height=400)
Line 36 is where the Rawturtle is created, this is passed to (line 7):
class GraphicsPen(RawTurtle):
Line 47 initializes the RawTurtle with a target of the canvas:
self.graphic = GraphicsPen(self.canvas,0,0,'black',0,3)
1 2 3 4 5 6 7 8 9 10 11 12 13 14 15 16 17 18 19 20 21 22 23 24 25 26 27 28 29 30 31 32 33 34 35 36 37 38 39 40 41 42 43 44 45 46 47 48 49 50 51 52 53 54 55 56 57 58 59 60 | from turtle import * from tkinter import * from tkinter.ttk import * #Graphics Pen hold the Rawturtle for drawing class GraphicsPen(RawTurtle): def __init__(self,canvas,x,y,color,speed,width): RawTurtle.__init__(self,canvas) self.ht() self.penup() self.goto(x,y) self.color(color) self.speed(speed) self.width(width) self.pendown() #end __init__ #Application Class class Application(Frame): def __init__(self,parent): Frame.__init__(self, parent) self.parent = parent self.makeUI() #end __init__ def makeUI(self): self.parent.title('Fractal Generator') #Setup the fractal drawing canvas self.canvasFrame = LabelFrame(self, text = 'Canvas Space', width=410, height=410) self.canvas = Canvas(self.parent, width=400, height=400) self.canvas.pack(side=LEFT) self.turtle = RawTurtle(self.canvas) self.turtle.ht() screen = self.turtle.getscreen() screen.bgcolor('blue') self.onDraw() #end makeUI def onDraw(self): self.graphic = GraphicsPen(self.canvas,0,0,'black',0,3) for i in range(0, 4): self.graphic.forward(100) self.graphic.left(90) #end onDraw def main(): root = Tk() root.title('Assignment') app = Application(root) root.mainloop() if __name__ == '__main__': main() |
Running the code above produces the following output

Embedded programming on ATmega644 using Uzebox
After several months of building and designing an arcade based on Uzebox which uses the ATmega644 chip-set I finally took the time to put together and introductory course on embedded systems. Today I'm sharing the Slide-deck from that course, the Starter kit project and some hints and tips.
As part of the course participants coded, compiled (to HEX) a game and deploy that on a custom Uzebox console
As part of the course participants coded, compiled (to HEX) a game and deploy that on a custom Uzebox console
@uzebox @atmel #toolchain setup with batch file to startup. Kit installed in new arcade ready for coding camp pic.twitter.com/XdP6Mbo8VZ
— Muddy Games (@MuddyGames) June 2, 2016
Tuesday, 8 November 2016
Literature Review Rating
Draft Literature Review Rating
|
CATEGORY
|
Weight
|
4
|
3
|
2
|
1
|
0
|
|
Introduction
|
10
|
Exceptional introduction that is very engaging. Previews the structure
of the paper.
Clear and concise research question stated that is testable.
|
The introduction states the main topic and previews the structure of
the paper. Identifies the research question in an unclear manner, but is
still testable.
|
The introduction states the main topic but does not adequately preview
the structure of the paper. Identifies only part of the research question,
but is still testable.
|
There is no clear introduction or main topic and the structure of the
paper is missing.
The research question is not testable no matter how clear and concise
the question is.
|
|
|
Literature Review
|
15
|
Paper is exceptionally researched, extremely detailed.
|
Information relates to the main topic.
The paper is well-researched in detail and from a variety of sources.
|
Information relates to the main topic, few details and/or examples are
given.
The paper shows a limited variety of sources.
|
Information has little or nothing to do with the thesis.
Information has weak or no connection to the research question.
|
|
|
Study
|
20
|
Describes all the aims, procedure, sample, and measures. Lists all
steps in a detailed, sequential order that are easily followed.
|
Describe most of the aims, procedure, sample, and measures. Lists all
steps in a detailed, sequential order that are not easily followed.
|
Describe some of the aims, procedure, sample, and measures. Lists
steps in an order that are not sequential, not easily followed, or
incomplete.
|
Very poorly written description of the aims, procedure, sample, and
measures. Lists steps in an order that are not sequential, not easily
followed, or incomplete.
|
|
|
Results
|
20
|
All data is recorded and organised in a clear manner. All observations
are provided. Complete and correct analysis of data is provided with
supplementary use of graphs. Errors of experimentation are provided.
|
All data is recorded and organised in a clear manner. All observations
are provided. Analysis of data is provided with a few errors. Some graphs are
missing. Errors of experimentation are provided.
|
All data is recorded and organised in a clear manner. Some
observations are missing. Analysis of data is provided with a few errors.
Many missing graphs. Errors of experimentation are provided.
|
Incorrect data is provided regardless of inclusion or presentation of
all other criteria.
|
|
|
Conclusion
|
10
|
Excellent summary of topic with concluding ideas that impact reader.
Introduces no new information.
|
Good summary of topic with clear concluding ideas. Introduces no new
information.
|
Basic summary of topic with some final concluding ideas.
|
Lack of summary of topic.
|
|
|
References
|
10
|
Conforms to Harvard rules for formatting and citation of sources are
perfect.
|
Conforms to Harvard rules for formatting and citation of sources with
minor exceptions.
|
Frequent errors in Harvard format.
|
Lack of Harvard format/numerous errors.
|
|
|
Grammar/Usage/
Mechanics
|
10
|
Control of grammar, usage, and mechanics.
Almost entirely free of spelling, punctuation, and grammatical errors.
|
May contain few spelling, punctuation, and grammar errors.
|
Contains several spelling, punctuation, and grammar errors which
detract from the paper’s readability.
|
So many spelling, punctuation, and grammar errors that the paper
cannot be understood.
|
Research Proposal
Advancing Classical Game Control for
Accessible Contemporary Human Computer Interaction
Abstract
Classic
digital games pioneered a medium with intent, often despite the capabilities of
available technology, and habitually through measured design decisions. This research
aims to examine and evaluate classic digital games to discover processes, input
and output technologies required to create immersive games within the causal
and hardcore game space. This research will investigate and propose alternative
input and feedback mechanics. This research will be verified and applied in
academic, portfolio and commercial digital games. Through monitoring of
subjects involved in re-imagining, re-inventing and developing new forms of
gameplay for classic digital games; design principles will be identified to
assist in the development of novel forms of gameplay. This research will
collate, share and disseminate this experience juxtaposed with the reinvention
of classic game designs.
Subscribe to:
Posts (Atom)